The introduction of M-Pesa in Kenya in 2007 has fundamentally transformed the country into a Global Village and established it as the Silicon Savanna of Africa. This revolutionary mobile money service has given birth to the countless loan applications we see today, catalysed the growth of online banking, and sparked the rise of several other mobile money transfer platforms such as Airtel Money and T-Kash. As of September 2025, Safaricom reports indicate that M-Pesa has reached an impressive 37.9 million active users in Kenya alone, making it an indispensable financial service powering daily transactions nationwide.
With M-Pesa, Kenyan users can not only send and receive cash seamlessly but also purchase goods and services online with unprecedented ease. The platform’s innovative features include the M-Pesa Global Visa Card and the highly practical M-Pesa Xpress Billing service, both specifically designed to enable smooth application purchases on the Google Play Store without requiring traditional banking infrastructure.
Despite M-Pesa’s many years of successful operation in Kenya, surprisingly many users still find it challenging to access and utilise the M-Pesa Xpress Billing tool effectively. You’ll be pleased to discover that the process is far less complicated than it initially appears, and this article provides all the essential knowledge you need to master this service for Play Store app purchases.
What is M-Pesa Xpress Billing and Why Does it Matter?
For those who may not be fully familiar with this service, Safaricom and Google launched M-Pesa Xpress Billing in 2018 through a strategic collaborative partnership. This innovation was specifically designed to allow Kenyans to make app purchases on the Google Play Store seamlessly, even if they don’t have traditional bank accounts or international payment cards like Visa or Mastercard. This development was particularly significant, given that a substantial portion of Kenya’s adult population remains unbanked yet actively participates in the digital economy.

M-Pesa Xpress Billing functions as a direct carrier billing solution, meaning that when you purchase an app or digital content from the Google Play Store, the charges appear directly on your M-Pesa account rather than being processed through traditional banking channels. This system eliminates the barriers that previously prevented millions of Kenyans from accessing paid applications and digital services.
The service represents more than just a payment method; it’s a bridge between Kenya’s robust mobile money ecosystem and the global digital marketplace. By integrating M-Pesa with Google Play, this partnership has democratized access to premium applications, educational software, productivity tools, and entertainment content for millions of Kenyan smartphone users.

Some of the benefits of using M-Pesa Xpress Billing are:
- Payments are processed instantaneously, which means your paid downloadable applications become available immediately after the transaction completes
- It’s more secure since you will be required to enter your M-Pesa Pin after receiving a prompt on your phone, protecting you from the risks of fraud
- Since most Kenyans are already comfortable using M-Pesa for daily transactions, Xpress Billing feels natural and intuitive
- All transactions are processed in Kenyan Shillings, eliminating confusion about exchange rates or foreign transaction fees that might apply with international payment methods
Requirements: What You Need Before Getting Started
While M-Pesa Xpress Billing is designed to be accessible to all Kenyan M-Pesa users, there are specific eligibility criteria that must be met for the service to function properly. Understanding these requirements upfront will save you time and prevent frustration during setup.
- You must be using a smartphone running Android 6.0 or higher. However, for the best experience and to access all features, we recommend Android 8.0 or newer
- You must have an active Safaricom SIM card, and your phone number must be properly registered with M-Pesa services
- Your M-Pesa wallet must contain enough balance to cover both the cost of your intended purchase and any applicable transaction fees
- You need a Google account that’s properly linked to the Google Play Store on your device
- Ensure you have reliable mobile data or Wi-Fi connectivity during the setup and purchase process, as interruptions can cause transactions to fail or become incomplete
- Make sure your Google Play Store application is updated to the latest version available for your device to ensure compatibility with M-Pesa Xpress Billing features
Complete Step-by-Step Registration Process
Setting up M-Pesa Xpress Billing in your Google Play Store requires careful attention to detail, but the process is straightforward when you follow these comprehensive steps:
More Read

Phase 1: Accessing Payment Settings
Begin by opening the Google Play Store application on your Android phone. You’ll need to navigate to your account settings, which you can access by tapping your profile icon (usually displaying your profile picture or initials) located in the top-right corner of the Play Store interface.
From the dropdown menu that appears, select “Payments & subscriptions.” This section houses all payment-related settings for your Google Play account, including existing payment methods, subscription management, and billing history.
Phase 2: Adding M-Pesa as a Payment Method
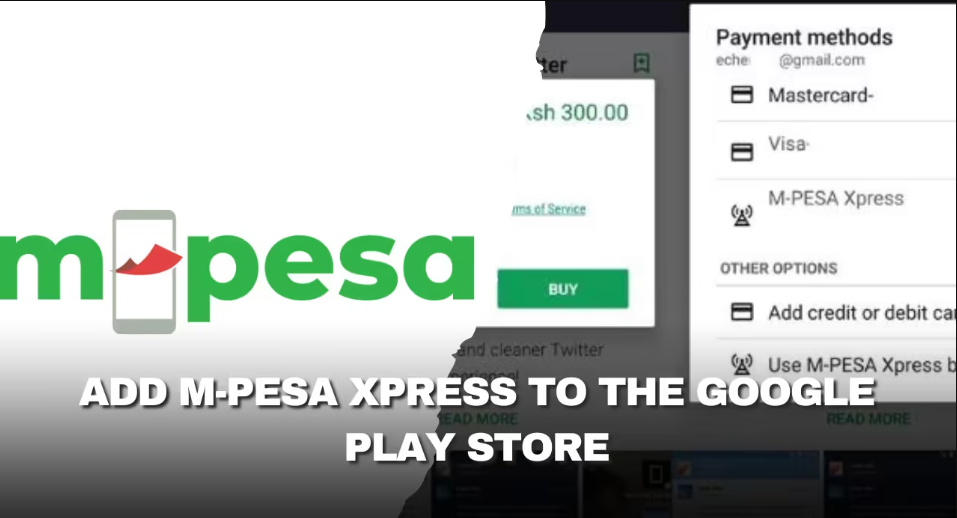
In the Payments & subscriptions section, locate and tap on “Payment methods.” This will display all currently linked payment options on your account, including credit cards, PayPal, and other services you’ve previously added.
Look for the “Add payment method” option and tap it. You’ll see a list of available payment options for your region. Since you’re in Kenya, “M-Pesa Xpress” should appear among the choices. If you don’t immediately see this option, ensure you’re using the Safaricom network (not Wi-Fi) and that your Play Store app is fully updated.
Phase 3: Registration and Verification
After selecting “M-Pesa Xpress” from the list of available payment methods, you’ll be directed to a registration interface. Here, you’ll need to enter your M-Pesa phone number exactly as it’s registered with Safaricom, including the country code (+254). Double-check this information carefully, as errors here will prevent successful verification.
The system will also request additional details to verify your identity and ensure the account security. Enter all requested information accurately, as discrepancies can cause registration failures or delays.
Once you’ve submitted your details, you’ll receive a verification code via SMS to your registered M-Pesa number. This typically arrives within 30 seconds, though it may take up to 2 minutes during periods of high network traffic. Enter this verification code in the provided field promptly, as codes usually expire after 10 minutes for security purposes.
Phase 4: Finalizing the Setup
After successful code verification, the system will guide you through any additional prompts needed to complete the setup process. This might include accepting the terms of service for M-Pesa Xpress Billing or confirming your understanding of how charges will appear on your M-Pesa account.
Once all steps are completed, you’ll receive a final SMS message confirming that M-Pesa Xpress Billing has been added to your Google Play account. This message serves as your confirmation that the service is now active and ready for use.
You can verify a successful setup by returning to the Payment methods section in your Google Play settings, where M-Pesa Xpress should now appear as an available payment option alongside any other methods you may have configured.
Making Your First Purchase
With M-Pesa Xpress Billing successfully configured in your Google Play account, you’re now ready to make your first purchase. Here is a quick process that you can follow:
- Open the Android Google Play Store on your phone and use the search bar to locate any app that you want to purchase
- Once you locate an app, tap on it to view more of its details, including its price in Kenyan Currency (KSh)
- Next, tap the Install button to buy. You will then be prompted to choose a payment method. Select “M-Pesa Xpress” .
- Next, you will need to confirm the purchase. Do so, and immediately, you will receive a prompt on your phone requiring you to enter your M-Pesa Pin to finalize the buying process
- After the purchase, you will receive a confirmation message from M-Pesa confirming that your transaction was successful. Then, you can download the paid app on your phone
Common Issues & Solutions That Actually Work
Even with careful setup, users sometimes encounter issues when using M-Pesa Xpress Billing. Understanding these common problems and their solutions will help you resolve issues quickly and maintain uninterrupted service.
Issue 1: M-Pesa Xpress Billing Not Appearing in Payment Options
This is perhaps the most frequently reported problem, and it typically stems from device or network configuration issues. The most common cause is having multiple SIM cards active on your device at the same time. When your phone contains SIM cards from different networks (such as Safaricom and Airtel), the Google Play Store may become confused about which network to use for carrier billing.
Solution: Temporarily remove any non-Safaricom SIM cards from your device during the setup process. Ensure that only your Safaricom SIM card is active and that you’re connected to the Safaricom network (not Wi-Fi) when adding M-Pesa Xpress as a payment method. After a successful setup, you can reinsert other SIM cards, but always ensure the Safaricom line is set as your primary data connection when making purchases.
Issue 2: Extended Delays in Purchase Confirmation
Some users report that purchase confirmations take unusually long to appear, causing uncertainty about whether transactions have been completed successfully.
Solution: This issue is almost always related to network connectivity problems. For optimal results, use Safaricom mobile data rather than Wi-Fi when making purchases, as this ensures the most direct connection to Safaricom’s billing systems. If you must use Wi-Fi, ensure you have a strong, stable connection with fast internet speeds.
If you’re already using mobile data but still experiencing delays, try switching to a different network mode (e.g., 4G to 3G) or moving to an area with stronger signal strength.
Issue 3: Transaction Failures or Error Messages
Occasionally, transactions may fail due to technical issues, leaving users unsure whether they’ve been charged or need to retry their purchase.
Solution: First, check your M-Pesa balance and transaction history by dialing *334# to confirm whether the charge was processed. If the money was deducted but you didn’t receive the app, contact Google Play support with your transaction reference number.
If the transaction failed completely, try clearing the Google Play Store app cache before attempting another purchase. Navigate to Settings > Apps > Google Play Store > Storage > Clear Cache. After clearing the cache, restart your device completely, then try the purchase again.
Issue 4: Verification Code Not Received
During the initial setup process, some users don’t receive the SMS verification code needed to complete registration.
Solution: Ensure your phone has an adequate network signal and that you haven’t reached any SMS receiving limits on your account. Wait at least 5 minutes before requesting another code, as multiple rapid requests can delay the system.
If you still don’t receive the code, try temporarily switching your device to 2G or 3G mode, as these older network technologies sometimes deliver SMS messages more reliably than 4G in areas with poor coverage.
Issue 5: PIN Entry Problems
Some users report difficulty entering their M-Pesa PIN during the purchase confirmation process, often due to interface issues or timing problems.
Solution: When the PIN entry prompt appears, take your time entering the digits carefully. The system typically allows up to 3 minutes for PIN entry, so don’t rush. If the prompt disappears before you can complete the entry, the transaction hasn’t failed – simply restart the purchase process from the beginning.
Ensure your M-Pesa PIN is active and hasn’t been blocked due to previous incorrect entries. You can verify this by attempting a simple M-Pesa transaction (such as checking your balance with *334#) before making Play Store purchases.
FAQs
How to use M-Pesa Xpress in Google Play?
To use M-Pesa Xpress in Google Play, open the Play Store, select a paid app, and tap the price or Buy button. On the payment screen, choose M-Pesa Xpress as your payment method, confirm the purchase, then enter your M-Pesa PIN when prompted via STK push. Once the payment is processed, the app or digital item starts downloading automatically.
How do I add a billing method on Google Play?
Open the Google Play Store, tap your profile icon, then go to Payments & subscriptions and select Payment methods. Tap Add payment method and choose from the available options, such as credit or debit card, carrier billing, M-Pesa Xpress, PayPal, or redeeming a code/gift card, then follow the on‑screen instructions.
How to register for M-PESA Xpress billing?
Open Google Play, go to Payments & subscriptions, then Payment methods, and tap Add payment method. Select M-Pesa Xpress, enter your Safaricom number, confirm, and complete the STK push by entering your M-Pesa PIN to activate carrier billing on your account.